Thursday, January 6, 2011

A&S 50 Challenge Project 9: Viennese "Zeppelin" bread

For today's project, I went browsing through Clayton's bread book again, and this recipe caught my eye, I confess, mostly because of the reference to the zeppelin. 

Bread making is an excellent opportunity to cultivate patience.  I tell myself this every time I start a sponge, and one of these days I'm going to actually cultivate some patience. Haha.  Maybe.  Anyway, this recipe is very similar to most basic white wheat breads, but the sponge in this recipe is set aside at room temperature for three hours.  That's a very long time! 


Sponge: before


Sponge, after 3 hours
So, to start off, two cups of flour and two measures of yeast (about a scant tablespoon each) are measured into a bowl.  This is mixed  with two cups of hot water until smooth, and then a light layer of flour is sprinkled on top of the gooey sponge.  This then rests for three hours, covered, at room temperature.  Fortunately, I don't start classes until next week, so I spent the time working on a couple of small, unfinished sewing projects that have been sitting around waiting for me to complete.  Huzzah for hand work!  So, at the end of the three hours, I braced myself, and uncovered the bowl where, to my delight, there was a bubbly goo!  The resting period allowed for some fairly impressive gluten formation, apparently, as I found as I stirred the sponge down into a manageable gloop.  (That's the technical term, I swear!)    

Before rising
After first rise
Oil, salt, a little warm milk and about two more cups of flour were mixed in, and then I began the process of kneading in the remainder of the flour, about a quarter-cup at a time. I like to knead my dough on the counter, occasionally throwing it down onto the counter during the process.  It took about ten minutes, and the dough was very silky, with a lot of life to it.  This recipe calls for the dough to be greased and put into a bowl to rise.  Honestly, I normally skip this step, and just throw it back in the mixing bowl.  This dough was very springy, though, and I was curious to see what would happen, so I washed the bowl, and tossed the dough back into it with a little olive oil, turning it a couple of times, and then covering it with a clean kitchen towel.  Most modern bread recipes call for the dough to rise under plastic wrap, waxed paper, or some other modern material.  I prefer a clean kitchen towel, and always use that instead.  This dough rose quickly, easily doubling in size, with visible air bubbles under the surface. 

This recipe also calls for two rising periods before shaping, one for an hour, the second for about twenty minutes.  I punched the dough down, re-covered it, and then the fun part!  The author suggested placing a small "can of ashes" in the oven while baking, apparently to replicate the "wood fired oven" flavour in the bread.  We have a fire pit outside, but it's also the middle of winter, and it's been snowing all day, of course!  I'm a Norsewoman, however, and, undaunted by a little snow, I headed out to the back yard and rummaged in the fire pit for some ashes.  Unfortunately, the ashes were all cemented into a solid block of ice.  I did manage to chip out some charred wood, which I put in a small make-shift foil container and set on the floor of the oven, as recommended.  (Note:  In the future I will use actual wood ashes, and lots more of them.  In the end there was minimal aroma of wood smoke noticeable and almost no impact on the final flavour, sadly!) 

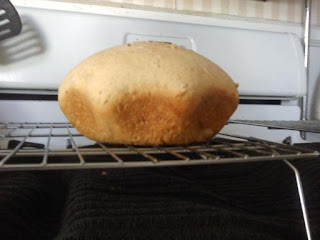
Now, this bread is named for the shape of the loaves, and this is one area I need more practice on, but I managed to divide the dough into three sections and shape it into roughly the "slender football" shape recommended by the author.  After another period of rising under the kitchen towel, the loaves were slashed, brushed with salt water, and baked at 400°F for about 45 minutes, brushed with the salt water every fifteen minutes during the process.  They came out beautiful, if a teensy bit lopsided, with a nice brown crust. 

After the required "cooling off" period, we sliced into them, and they were really lovely.  The salt water created a nice, chewy crust, and the crumb was slightly irregular, but very tender, with small air pockets throughout which give it a nice rustic look and feel.  This bread is good enough to eat as-is, with a nice flavour from the salt water, and my kids quickly demolished half a loaf.  (Luckily, this recipe makes three loaves, so we have plenty for dinner tonight still!) 

Mirianna enjoying the Viennese "zeppelin" bread.
My 11 year old daughter, known in Society as Mirianna, was happy to pose for a picture, as long as I let her have yet another butter-slathered slice as a bribe.  A small price to pay!  This is another excellent recipe for a feast, with a more rustic look and feel to it which would be an enhancement to any feast table! 

Tuesday, January 4, 2011

Operation: Haggis One!

Contrary to recent appearances, here at the homestead we do more than bake bread.  In fact, there's nothing my Lord and I enjoy more than serving some unfamiliar dish to somebody and hear them say (sometimes after a little encouragement to "... just taste it!") , "WOW!  That's really good!"

We think we can make that happen with haggis. 

Yes.  I said haggis.  Relax.  I know it has a bad reputation, but really, it's going to be OK.

Haggis has this reputation as the ultimate nasty food.  Most people I know would eat bugs before they'd try haggis, which is somewhat unfortunate, in my opinion.  I mean, haggis is just a type of sausage, really.  Ground meat, with some spices and herbs and filler (in this case oatmeal), cooked and served up.

Seems easy enough.  We're up for the challenge!  The hard part was finding the meat.  We chose to go with liver, heart and tongue, and had to special order them from a shop in Indianapolis (unlike the ancient Scots, we don't have our own flock, alas).  The people at Goose the Market were super helpful in our quest to locate fresh organ meats, although stomachs were unavailable, so we picked up some pig stomachs at Saraga International Market (WE LOVE THIS PLACE!  If you're looking for a good broad spectrum of ethnic food ingredients, I can't recommend it highly enough!)    Here's the stomach, still in the package.  NOTE:  These stomachs have been cut open, and cleaned.  That's great... except it creates problems when you want to use them as a steaming pouch. ;)  You'll see my nifty solution later! 

So, with lamb tongue, heart and liver in hand, we're ready!  The first step is to soak everything in salt water.  After thawing the organs out (they came to us in frozen bricks.. heh), I put the organs in a plastic bowl of salt water and let them rest for about 5 hours.   In this picture, from the top left there is liver, tongue, and heart.  The butchers had already cleaned the organs (removed the gallbladder, split the heart, etc.), which was nice!  Made my prep work go a lot quicker.  Nothing ruins liver like accidentally nicking the gall bladder!  So, here you see the organs already soaked and rinsed.

After that, I covered the organ meats with cold water, brought them to a boil, covered the pot, reduced the heat, and simmered them for about a half hour. The oats are supposed to be lightly toasted for this recipe, so I put them on medium-low in the skillet while I kept an eye on the simmering pot.  Steel-cut oats are used in the recipe.  Remember those from the Scottish Oat Bread a couple of projects ago?  Here they are as they toast in the skillet.  Mmmm.  Good stuff!


 I will tell you, during this entire process, the biggest "icky" moment I had was boiling the organs.  At about 15 minutes into the simmering process, I guess the fats in the organs gave up the ghost and started to render out, and that was both a somewhat unpleasant smell and look.  Fortunately, it didn't last very long!   After 30 minutes, the organs were firm and cooked, so I drained them, then began mincing the meat.  I did peel the top layer off the tongue, because it felt a little tough and chewy and I didn't want that in my haggis.  I chopped the heart and tongue, then grated the liver (it was easier than chopping, honestly!). 
 
 
Other ingredients we used were diced suet, onions, garlic, sage, thyme, salt, pepper.  We're flying by the seats of our pants on the seasonings, because we didn't like the idea of nutmeg/mace.  Maybe it's not traditional.  However, we know the spices we used would have been available, so I'm willing to go with it for the sake of science.  My Lord, known in the SCA as Uisdean mac Cailin, graciously chopped the onions and garlic for me while I was working on preparing the stomach.  (You should try his brisket some time if you get the chance.  By Freyja's Frozen Left Earlobe, it's a rare treasure!)  Thanks, Love!  :) 

Now, remember that stomach that's all flat?  This is where all those frillion hours stitching garb by hand came in handy.  With a large needle, some kitchen twine, and a little ingenuity, I sewed the stomach into a pouch, leaving the top open so we could fill the stomach with the haggis filling.  If you do this, I recommend having a paper towel handy.  The needle gets a little slippery when it slides through a soaked stomach!    Here's my beautiful A&S entry... just kidding.  But it worked! 

Important note:  You have to leave room for the oats to expand.  Now, I will be honest.  Using the "rudely stitched together stomach" method, I think this is less of a crisis, as the air in the stomach is going to escape through the gaps at the "seam", but you do need to be mindful that the oatmeal is going to expand as it cooks, so we went ahead with the recommendation of filling the stomach 2/3rds full.  Traditionally, you'd poke the stomach with a large needle as it cooked to let out the air.  Ours is "pre-poked".  Haha!  So we're in decent shape.  We also had WAY more filling that we had room for in the stomach pouch, so we put the rest of it into a casserole with a couple of bay leaves on top and covered it loosely, put the casserole dish in a water bath,  and baked it at 350F. 

The stomach was submerged in a pot of boiling water with a couple of bay leaves, with the handy leftover string tied to a spoon for easy retrieval when it's done.  We honestly have no idea what we're doing at this point, since neither of us have ever made a boiled pudding, so this is pure conjecture from here on out!  Uncharted territory!  Huzzah!

The recipe calls for the haggis to gently boil for three hours.  The pork stomach is *much* smaller than the sheep stomach would be, but really, the last thing we want is undercooked haggis, and it's not like you can gently open the baking dish and peek at it, so we're going to let it go the full three!  


So, the proof is in the pudding.  We pulled the casserole out of the oven, and the stomach out of the boiling water.  It's 11pm, so we didn't dance Road to the Isles to Scotland the Brave or anything feisty like that, instead we just carved open the haggis and dove in.  The casserole was a little drier, which makes sense, as it was NOT boiled for three hours.  The flavour was very good, although the mineral tang of the organ meats was fairly pronounced.  The "traditional" haggis, however.  Oh my.  Oh my!  The pudding is creamy and delicious, with just the barest hint of the flavour of the liver.  The onions and garlic melted into the meat mixture, and the oats absorbed the flavour beautifully.      I believe that to appeal to Midwestern palates, we're going to have to adjust the spices a little, perhaps add some nutmeg, or add more fresh-cracked black pepper, or maybe some rosemary, but this is *definitely* delicious.  I'm so thrilled! 

For a little more proof, here's my son, knowin in Society as "Piro", agreeing to be our stalwart guinea pig.  He's 13, and while we can all agree teenage boys are bottomless pits, I think this is still pretty telling!

A&S 50 Project 8 : Limpa Bread

Today my Lord and I are making haggis.  However, I didn't want to make another Scottish bread today, just because.  Instead, I tried a recipe for "Limpa", a Swedish rye bread.  This particular recipe calls for orange peels.  I imagine dried orange peel would have been available, via trading, etc.  I'm going to try it again without the orange peel, but I have to say it is a nice addition!

The recipe starts out by mixing the rye flour and the yeast with some hot water, stirring it and letting it sit a bit.  This is sort of like a sponge-light, since it only sits about 30 minutes, enough to proof the yeast, but that's about it.  Rye flour is interesting to work with.  It is really grainy and I have to say at the sponge stage, it's a little like freshly mixed cement, greyish and gooey.


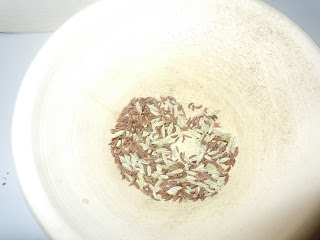
Undaunted, I forged ahead, because I've played with rye flour before and I know it's just teasing and will grow up to be delicious.  The recipe I used called for fennel, caraway and cumin seeds, ground and mixed into the dough with grated orange peel.  Trusty mortar and pestle at hand, the seeds were measured and quickly ground up.  I was speaking to an acquaintance from Sweden while I was working on this recipe, and he said that fennel, caraway and cumin seeds are packaged up and sold together as "bread spice" in Sweden.  Huzzah!  So, before  grinding:

And here's the gooey mass with the orange peel and stuff waiting to be mixed in:


And now we go back to the basics, kneading in the bread flour a little bit at a time (I work with about a quarter cup and a time, until I start actually kneading, and then it's just a sprinkle at a time).  I notice that the times I've worked with rye flour, the dough seems to get sticky really fast and stays sticky a long time.  Rye's dense, though, and I'd rather work slow and end up with a lighter bread, instead of getting all crazy with the flour and winding up with a brick!  So, after about 15 minutes of slow kneading, I had a lovely little ball of dough ready to set aside to rise.

While the bread was rising, I worked on the haggis a bit (I'll be detailing that later this evening!  Stay tuned!  No, seriously, it's ok!), did a little embroidery, etc.  I always worry about flours other than wheat, and if they're going to rise properly.  I probably just need to do lots and lots and lots of baking with the other flours so my confidence is more solid.  Fortunately, this batch did just what it was supposed to.  (I used the measuring cup for calibration in the pictures!)   See? 


So, I've never had limpa bread.  I've never SEEN limpa bread.  I've got nothing to work with other than the recipe and the description from the author who got the recipe from a woman who spent most of her life in Sweden, who makes both a flat style of bread and round loaves.  Round loaves are familiar to me, and so that's what I opted for.  There was no mention of slashing the loaves, but I like the look, so I went ahead and did a simple cross-slash pattern.  (I'd rather do a Thor's hammer, but I don't think the loaf would rise evenly with an asymmetrical pattern.  Hrmm.. have to try it and see what happens!) 

Forty five minutes of rising, and the loaves went into the oven, where they baked until brown and hollow, the usual "bread test".  The bread actually overpowered the smell of the haggis ingredients cooking, which is saying something. ;)  They came out of the oven to rest for a bit before I couldn't take it anymore and had to cut a slice to taste.  I was pleasantly surprised by how much more the bread rose while baking, too.  I will definitely try the flattened loaves next time, just to see what they are like!


This bread is very tasty, with a nice light flavour from the ground seeds and the orange peel.  It's much lighter than most commercial rye breads I've had, and the crust is very nice and chewy.  This is another keeper, to be sure!  Now to get Mama Thorhalla's family recipe and see how it differs!! 

Friday, December 31, 2010

A& 50 Project #7 - Mixed Loaves #1

Today's project is a braided loaf of white and pumpernickle rye bread.  I was concerned, because rye bread is a lot denser than a basic wheat bread, and I wasn't sure how they'd do together in the same loaf.  Fortunately, my experiment worked!

To start off, I actually created the sponge last night, mixing the rye flour, water, and yeast together and letting it sit overnight.  This particular recipe called for a rather stiff sponge, so I wasn't sure what I was going to find this morning, but luckily it did seem to rise, albeit not as "fluffy" as a basic processed white flour sponge normally typically becomes.  It certainly was a lot denser to work with as I kneaded the bread flour into the rye sponge.  The rye flour creates an almost grainy textured dough, and it's very heavy and not as elastic as a "white bread" dough. 

Molasses gives it a nice brown colour, however! (I've read you can add cocoa powder if you want to make it a very dark rye bread. I refuse to use cocoa in my cooking when it comes to Anything SCA, mostly because I don't like chocolate, and it's a *very* late period ingredient anyway, which none of my personas would have known about!)

For the rest of the braid, I just used a basic white bread recipe.  I made two braids.  I think next time I will do a twist instead.  The Two-Pumpernickle/One White braid looks pretty, the Two-White/One Pumpernickle looks a little odd. ;)


The braids were brushed with an egg wash and sprinkled with a little bit of coarse salt, then baked at 350 until shiny and hollow-sounding.  The rye did not rise as much as the wheat, as can be seen in the "Unbaked" picture above.  I was a little worried at this point, but there's nothing to do but see what happens at this point, so into the oven we go!

Through some miracle of bread-making, the rye rose beautifully in the oven, and texture-wise, although it is a slightly denser dough, it baked up into a lovely loaf, with little differentiation, aside from the colour/flavour (caraway and molasses will do that!), in the crumb.


Next time I will definitely do a basic two-strand twist, rather than a braid, to get a more even distribution of the different doughs.  (If I do a braid, I'll throw in a third type of dough, perhaps a basic whole wheat?)  That being said, this loaf is *delicious* and pretty enough to serve as a centerpiece for a family dinner, which is how this batch will be used, for a New Year's day dinner. :)


Wednesday, December 15, 2010

Lussakatter : A&S 50 Challenge Project #6

In our modern calendar, Dec. 13th is celebrated by some as the Feast of Saint Lucy.  In Sweden it has a very special observance, with a processional, candles, and, most importantly for my purposes, a special saffron bread which I am going to attempt to recreate!  (If you're interested in learning more about this tradition, you can read about it here.)  This particular celebration is actually something I first learned about when I was in elementary school about thirty years ago, and at my church (Unitarian Universalist Church of Muncie) we have a woman who brought this tradition to the church over forty years ago, and it's still going strong.  Within the SCA, my Pelican, Meistara Thorhalla Carlsdottir af Broberg, is Swedish both in mundane and persona.  This one's for you, Mama T!

For the uninitiated, saffron is pricey!  Saffron is the dried "threads" from the crocus blossom.  We purchased 1.7 grams (yes... one-point-seven grams) of saffron last night for $15.55.  (that's enough for two batches of this recipe, as an example...).  In comparison, crack cocaine's most current prices (according to this site ) is about $40 per quarter ounce.  So technically, saffron is cheaper than crack, but it sure doesn't feel like it!   

In the kitchen, saffron is the world's most expensive spice.  (Seriously.  Click here to read about saffron prices!) As a side note, there are a number of "faux saffron" substitutes available which will create a similar colour, although the flavour is affected (not negatively, but it is a different flavour!).  If saffron is out of your budget, I recommend trying this recipe anyway and using turmeric or "Portuguese saffron" which is actually the stamens of the safflower plant.  READ THE LABELS carefully if you choose to use a saffron substitute.  Don't be misled just because the label says "saffron"!

Another tip: "real" saffron is packaged like the precious cargo it is.  The actual threads are in a small plastic package, inside a white paper package, inside this glass bottle which is sealed.  I'm fairly certain in some supermarkets you have to actually get it from the pharmacy, with the other controlled substances!  (OK, not really, but it is really, really well packaged.  Do not be alarmed!)  You may find (especially in some Hispanic food sections) "saffron" in a small cellophane bag.  It's good.  It's just not "the real deal."  (I have used that with good results for various rice dishes tho!)

 Saffron has a very unique, almost bitter aroma, and it imparts an incredibly rich orange-yellow colour to foods cooked with it (paella uses saffron!). 

For this recipe I ground the threads with a small amount of sugar, and steeped the resulting powder in warm milk.  The colour was exceptionally vibrant (my cell phone camera doesn't do it justice!), and I began to feel hopeful that this was going to work!


Here's the saffron all ground up with some sugar (I think this provides a little more of an abrasive surface, grinding the saffron finely).


Here you can see the colour of the milk right after the ground saffron was mixed in.  The colour deepened considerably as it steeped, while the milk was cooling down to a manageable temperature (approx 100F).


The recipe I used also called for "quark," which is apparently a type of European cheese which I don't have in my kitchen (I am so ashamed...). Cream cheese was listed as a reasonable substitute, however, so I mixed that in.  The dough is very rich and shiny with butter and cream cheese and milk all added to the flour/etc.  At this point the recipe becomes a fairly standard bread recipe, kneading, kneading, kneading... The recipe states that the dough should be shiny and silky, and to be careful not to add too much flour.  The basic proportions are: 2 cups milk, 1/2 c. butter, 1 oz saffron ($$$$), 2/3 c. sugar, 1/2 tsp salt, 3 pkgs yeast, and approx 7 cups flour.  (you'll need a little more flour for rolling out the bread, and an egg, beaten, for brushing it, later). 


After about 10 minutes of kneading, I had a nice vibrant yellow dough ready to rest and rise.  Back into the bowl, with a nice clean kitchen towel to cover it, and the waiting game begins.  Fortunately, I'm making soup for tonight's A&S meeting, so the kitchen is nice and warm and humid and the dough rose fairly quickly (about an hour).

After the dough was finally doubled, I punched it down, then divided it into 24 even pieces.  Each piece was rolled out into a rope and coiled into the traditional shape.  (Some people put raisins in the center of each spiral, but I personally don't care for baked raisins, and I'm out of currants.)  Saint Lucy is the patron saint of the blind (the stories are pretty gruesome, actually), and this shape is meant to represent a pair of eyes.  (It could be worse, I suppose!)
After brushing the little rolls with some beaten egg, they were baked until shiny and happy.  (I feel like I'm channeling a famous Indiana painter...)   They smell divine, and the rolls are very rich.  Hopefully next year I can get the saffron in time to make this delicacy for my family in  a more timely fashion!


Tuesday, December 14, 2010

A&S50 Challenge project 5: Scottish Oat Bread

In my quest to work my way backwards through history, and "all over the place" culturally (and because I don't have the saffron yet to make the Santa Lucia buns.. that's a project for tomorrow, though!), today I'm working on a Scottish Oat Bread recipe. 

The interesting thing about this recipe is it uses a sponge, and I am not terribly familiar with the use of sponges in bread making.  I normally just dissolve my yeast in warm water, let it bloom, and move on with my life.  I'm enjoying learning the nuances of this, though, and this particular project was especially interesting as it rested all night, which I'm certain helped soften the oats.

This recipe calls for a cup of "Scottish oats", also known as "steel cut", "pin oats", "Irish Oatmeal", and so on.  Rather than smashing the oats flat when they're processed, they are cut into small bits, about the size of the little beads on the end of many sewing needles.   
(That's a penny, for calibration)

So, to make this sponge, you pour boiling water over the chopped oats, add some flour and some sugar and the yeast, mix it up really good, and stick it in the fridge overnight. (I live in Indiana, and I was thinking about "life before refrigeration" as I was mixing this up last night.  I think setting it off to the side away from the hearth but inside the home, well covered so no curious cats/dogs/whatever tipped it over, would have worked, too, but setting it "outside", even in some kind of storage hut, would be bad.. the yeast would freeze to death.. ha!  Bad!  The idea appears to create a SLOW yeast fermentation process, not kill the yeastie-beasties from hypothermia!).  In the morning, you have this foamy, frothy goo that's rather yeasty-smelling and sort of lumpy.  Appetizing, no?

After that, it's much like any other bread.  Add warm water or milk (I went with milk), a fat (in this case the recipe called for butter), some salt, and some flour, and mix and knead until it's a smooth, happy, elastic mass.  this recipe also calls for a little ginger, and I think that's a delightful thing to use, so I added it.  The oats are very noticable in this dough.  They are definitely softened by the soaking process, but they in no way disintegrate into the dough, as you can see here:

Once the dough has risen and been punched down (see above), you knead it briefly on a floured surface and divide into three parts.  I like to try new things. I have a couple of different baking pans, so for this I went with my "regular" metal loaf pan, a silicone loaf pan (we met these in the Shaker bread project) and a fluted pan which I normally use as a form for bread baskets by tipping them upside down and draping the dough *over* them.  It's the holiday season, though, so I thought we'd try this and see if this turns out a pretty, semi-decorative loaf.
I like simple, round (or oval) loaves, but variety is a lovely thing. It adds visual interest to a feast table, for sure, and it can provide a simple way to differentiate between types of breads, especially useful if you have people with particular allergies. "The braids have cinnamon, the twists have barley..." etc. In this case, I am just experimenting, since we'll eat these here at home, unless a loaf somehow survives until A&S night tomorrow night! (Miracles DO happen, sometimes....) So, the little loaves are nestled in their pans, and we wait the requisite "until doubled" time.  It's winter, and I keep my house fairly cool, so it takes a little longer (usually about an hour and forty-five minutes) for this stage of things.

As I waited for the dough to rise, I speculated on how common oat bread might have been during "period" eras.  We know oats have been a foodstuff for an exceptionally long time.  My persona is Viking-era Danish, and oats and oat cakes have been found in both grave finds and midden pit excavations.  For the "statistical breakdown", however, I did some digging, and came across an article entitled, "Grain Yields on the Winchester Manors in the Later Middle Ages" by D.L. Farmer in the November 1977 edition of "Economic History Review"  (Nov77, Vol. 30 Issue 4, p555-566, 12p, per an EBSCO database search.  I love being a college student with access... ahhhhhh....).  This article addresses the yield of wheat, barley and oats at various manors in the Winchester Bishopric of southern England, and averages the yields of the "most successful" manors, and compares them to the "least successful."  It's an interesting read, and I recommend it on its own merits.  For the purposes of this particular "I wonder...", however, it shows that wheat, barley and oats were harvested in more or less equal numbers of bushels, with exceptions in various years, due to environmental conditions, etc, and, in fact, oats and barley yields improved significantly in the period immediately following The Black Death, according to Farmer's data (the author speculates that wheat yields were adversely affected by a decline in available field workers during the time of the Black Death, although oat yields declined significantly in the late 15th century, according to this article, while wheat production grew by leaps and bounds).  So, it stands to reason that oats would be a viable, and relatively common, foodstuff, so this bread is close enough for my purposes to being a viable "period-plausible" recipe.  Huzzah!

It can be all too easy for me to get lost in research, and the timer buzzing ripped me from my perusals!  Alas!  The loaves were lovely and ready to go into the oven, though, so I brushed them with some melted butter and slid them into the oven, pouring some water into the metal pan on the bottom of the oven before closing the door.  (I don't have a fancy steam-injected oven, but I love what steam does to the crusts!)

The fluted loaf finished baking first, as I'd used a smaller amount of dough, being uncertain exactly how it would respond (new dough, new pan, new technique...).  It turned out super cute, however, and I think this has major potential as a "centerpiece loaf" perhaps in a bread basket with some honey butter beside it...


The "regular" loaves took about 15 minutes longer to bake, and I brushed them with some more melted butter when I pulled the fluted loaf out of the oven, as they were still very pale (and I like the rich buttery crust, anyway!).   This particular bread did not rise/expand as much as the wheat ones do, so there's less difference in the shape/size of the loaves from the metal vs. silicone pans, too.  (In the picture below, it's metal->fluted metal->silicone, in that order.)


My entire house smells amazing.  The ginger is not really noticable, it's more of a hint of "something extra" in the bread.  The texture is a little chewy, with the oat still very much noticable, but pleasantly so.  It's a surprisingly light bread, too.  Definitely a keeper!!


Saturday, December 4, 2010

Are you "Hungary"?

It's been a while since I cracked the pages of my "Bread Bible" and rifled through, and tonight my youngest daughter, Emily (Or Emma Solveigsdottir, in SCAdian terms...she's 9) perused the pages and noted some recipes which require overnight (or longer) soaking of the grains, which sounds like an excellent idea, but no good for dinner tonight.  Bookmarked for later, we perused further...

In the interest of time, we opted for a fun-sounding Hungarian bread called "Pusstabrot."  I know!  Appetizing name, eh?  We thought that alone made it worth the effort. ;)

If you like "pan anise", a Mexican bread with anise, I think you'd like this bread.  The recipe calls for a half teaspoon of fennel, toasted and ground, and added to the flour.  I've never toasted fennel seeds before so we slowly roasted them in a cast iron skillet over low heat until the seeds turned brown, then took them off the heat and ground them in the mortar and pestle.  Toasting the fennel gives it more of a "nutty" smell than one usually finds with that particular spice, without losing the distinctive flavour of the seeds.

Other than that, this is a very straight-forward white bread recipe, with all the usual "mix, knead, rise, shape, rise" goodness one finds in a basic yeast bread.  Once the bread has risen, you knead it a bit to work out the air bubbles and then shape it into loaves.  I'm fond of a basic, elongated loaf, on a flat baking sheet most of the time, and we went with that this time, as well.  I feel it provides a crustier finished product, and the crust is the best part of home-made bread!  Another hour-ish of rising, and the loaves are ready to finish off before sliding them into the oven.

A long slash down the length of each loaf adds definition and prevents the loaf from going all crazy and rising any which way it wants, and an egg wash comprised of egg white, a teaspoon of water, and a pinch of salt (the salt seems to help break down the proteins in the egg white) goes on top, then a sprinkling of fennel seeds to complete the loaf, and into the oven they go.

The hardest part of bread making is the patience each step requires.  I struggle with patience under any circumstances, but when I forget to start the bread in a timely fashion so it's done with ~plenty~ of time for me to complete dinner, as well, it's especially hard.  But, there's nothing more disappointing than cutting into a beautiful loaf, to find a semi-gooey mess inside.  So, we waited patiently for the loaves to bake, as the fragrance of the bread, and especially the fennel seeds filled the kitchen and teased us mercilessly!

Now, remember, we're a SCAdian family, so while the bread is rising, we're not just surfing FaceBook, or watching TV or something.  Emily and I are working on a couple of different projects.  I'm embroidering the sleeves for my new woolen kirtle before piecing them into the body, and Em's just practicing her stitching. 


Finally, that wonderful smell that says "Hey, I think the bread is done!" wafted from the kitchen, and we raced in to check on the loaves.  To our delight, they were nut-brown and shiny and delicious-smelling!

That fifteen minutes of waiting for the bread to "cool" so you can slice into it is excrutiating, and we sat in the kitchen and stared at the timer, Emily trying to convince me it would be ok to cheat, a little, me extolling the virtues of patience (right.. I'm SUCH a role model!)

The Hungarian bread was a *major* success.  The loaves are light, very light, and delicious.  The fennel is a delicate hint, not overpowering, and it's an excellent compliment to the curried chicken and sauted zucchini that made up our dinner tonight. I will definitely make this bread again!